Or How To Build A Pond And Alienate People…
One of the best things you can do to encourage wildlife in your garden, yard or terrace is add water.
From a small washing up bowl to a large wildlife pond complete with a fountain to rival the Bellagio casino, adding a body of water to your outdoor area provides a life support system for countless numbers of critters.
Now, if you’re anything like me, building a pond can seem a somewhat insurmountable task; What do I need? Where can I get it? Where and when do I do it?
As a matter of fact, I actually started this process about fifteen years ago when I purchased a book about building ponds… and then proceeded to use it to prop up a desk for the next decade and half… however, more recently, I found that if I break things down into a recipe-like structure, things become a little less daunting.
That is to say, you don’t need to be Alan-bleedin’-Titchmarsh to build a decent wildlife pond in your garden and during this time of fluctuating freedoms, there’s scarcely a more rewarding way to spend the day avoiding people!
So, without further ado, buckle up for a ten-step-guide on how to build a pond and alienate people.
Ingredients
Quantities and types of material are largely open to personal taste and requirement, but for the most part the process remains the same. With that in mind, all items are available from any half decent garden centre so support your local if you can! However, I’ll provide a few Amazon links along the way to give you an idea of what you’re looking for.
- Preformed Pond Liner/Durable Container
- Sharp/Coarse Sand (3-4 25kg bags)
- Small/Medium Gravel/Stones (3-4 25kg bags)
- A Shovel
- A Spirit Level
- A Tape Measure
- Garden Twine
- A Good Selection Of Oxygenating Plants (to be discussed)
- 225g Caster Sugar
- 4 Medium Free Range Eggs
- 225g Self Raising Flour
Step 1: Where?
First, pop the sugar, eggs and flour to one side (you’ll thank me when you fancy a Victoria Sponge). Next, you’ve got to decide where you want to put your pond and ideally, you want to tick three boxes;
1. It should spend at least half of the day in direct sunlight (during the warmer months of the year, that is).
2. It should have a bit of shelter from the wind.
3. And finally, if you can, try to avoid positioning your wildlife pond where plants will overhang it as any foliage that falls into your pond will inevitably decay and encourage the growth of your new rival, algae *shakes fist*.
All things considered, finding that Goldilocks location that ticks all three boxes can be tricky, so try not to get too hung up on doing so. For example I built mine in front of a rockery (below) because it’s visible from our kitchen window and offers a cracking backdrop to the whole affair.
While this means the pond doesn’t face directly towards the sun (it faces South East) it still receives at least seven hours of sunlight a day and is shielded from prevailing winds by the house. So, you know, swings and roundabouts… or… ponds and rockeries…
Step Two: What?
Once you’ve found your sunny, Goldilocks location and bid a fond farewell to your favourite tanning spot in due course, it’s time to determine what size and shape is best for your wetland area.
Now to a certain extent, size doesn’t matter (least that’s what my therapist tells me) but installing a pond proportionate to your outdoor space is obviously most appealing. Liners with an uneven shape can provide a more naturalistic look but if you opt for a more regular design, chucking a few rocks or some turf around the edges can easily cover up those unnatural angles.
Likewise, as we’re building a wildlife pond rather than a fish pond, ours doesn’t need to be exceptionally deep or large. That being said, if you live in temperate climes, accommodating a depth of around 12-18 inches should stop your pond from freezing over Winter.
For somewhere cooler, consider a depth of up to 24 inches. Happily, most preformed liners come with sufficient depth inbuilt, so this is really a concern for our flexible-liner friends. At its deepest my pond reaches a depth of 14.4 inches, so hopefully I won’t find any frogsicles this Winter!
You can find preformed (and flexible) pond liners at any decent garden centre and they’re generally pretty inexpensive. If you’re buying the latter, make sure to buy some underlay too to help protect the liner from the earth below.
I bought my preformed liner from a local centre for around £30.00, however if you dare not venture out just yet, Amazon have a cracking selection too.
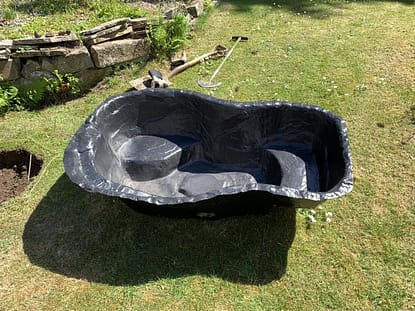
I’ve found Bermuda to be a reliable brand thus far and, while the liners are regrettably made from polyethylene, a type of durable plastic, they should last for twenty years or so.
I’ll pop a couple of links to Bermuda liners below. I opted for the medium one (see pic for scale).
*Top Tip: Placing a ping pong ball on your pond’s surface through Winter should stop it from freezing over while maintaining a hole through which oxygen can reach the water. I’m planning to try this trick when the weather takes a turn, so I’ll get back to you with the results… and when I say get back to ‘you’, I mean to my readership… and by my ‘readership’, I mean my mum… so I’ll get back to you with the results, Mum.
P.s I wish you wouldn’t charge so much for the views…
Step 3: When?
The short answer is Spring. Early Spring. It’s the best time to build your pond because it’s when the natural world springs back into life and gives your pond a chance to establish itself pre-Winter. However, always one to buck the trend, I built mine on the cusp of summer (at the end of May) in the UK and seem to be doing pretty well!
Furthermore, if you build in Winter, I’m sure things would start to bloom come Springtime too… you just might need a pneumatic drill to dig the hole… a link for which I’ll provide here…
.. not really… that would be ridiculous.
Step 4: Marking The Dig Site
Liner? Check. Location? Check. Motivation?… Motivation!? Oh… you’ve gone…
This is when things start to get interesting and I don’t use that word lightly… I use it incorrectly… nevertheless, you’ll need your liner, Garden Twine and a handful of sturdy sticks at the ready.
Now if you’ve opted for a symmetrical pond, then go ahead and flip the liner upside down and place it on the ground where you’d like your pond to be. If, however, like me, you selected an irregular shape, take a moment to swear gently under your breath, and keep the liner upright when placing it in your desired location (flipping it will cause you to dig your hole backwards).
Next, grasp your sticks and create a rough outline of the pond by pushing them into the ground at regular intervals around the liner.
Make sure to take into account the top lip of your pond, which ideally will overlap the edge of your hole (ooh matron!).
If you’ve chosen an irregular-shaped pond and thus are keeping it upright during this process, try your best to align your sticks with the top of the liner, as this is where it is at its widest.
If you don’t have any sticks and twine to hand, using a thin line of sand or even several small children to mark the pond’s perimeter should work just as well… just make sure the children are your own.
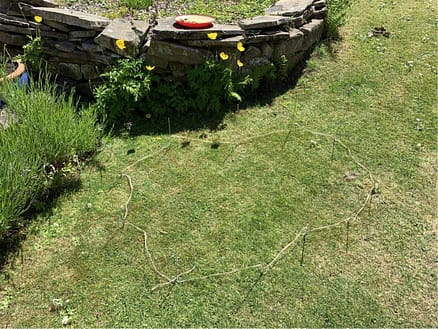
Right! Once your sticks (or children) are in place, pop the liner to one side and connect them using your garden twine. Voilà, you should have a rough outline of the hole you need to dig! As per, don’t worry too much about getting things exact – our coarse sand will help pack any gaps we leave later on.
Take my rather shoddy arrangement, for example… I actually used wooden kebab sticks to mark out my dig, which worked just fine… ruined the barbecue though…
Step Five: The Dig
Now that you’ve marked out where you’re going to dig, it’s time to fetch your shovel, spirit level and tape measure, keeping the latter to hand as, unless the measurements came provided with your liner, you need to measure the depth, length and width of each level of your pond. For example my liner has two shelves and a deeper section at its centre and I measured ’em all! Once you have your figures, it’s time to start digging.
*Top Tip: Softening the ground with water and dividing it into manageable, grid-like segments with your shovel (or an edger if you have one) before you start makes the digging process a whole lot easier.

First, remove the entire surface layer and dig down to the depth of your shallowest shelf.
As you’ve now dug out the shape of your hole, you can pull the sticks and twine out the way but keep them handy, you’ll need them to mark out your shelves…
Speaking of which, now you’ve reached the depth of your shallowest shelf, take your sticks and twine (or sand) and use the measurements you’ve already taken to mark it out accordingly.
Then, just keep digging, repeating this process for each section until you have successfully dug and shaped your hole.
*Top Tip: If you have a curved shovel, use it to help inform the curves of your hole (ooh matro-ahhh you get the idea).
Now, compact and flatten the bottom with your feet and smooth the sides as best you can. Oh and make sure to remove any stones you find in the process as these can damage your liner over time and cause leaks. Finally, use the spirit level to ensure the all the bottom surfaces are level.

Once you’re happy with the shape and level, gently lower the liner into your hole to see if it fits.
Don’t force it though, as any bends or buckles will create weak points and eventually cause cracks to develop.
Ultimately what you’re looking for is the bottom of the liner to lie within two centimetres or so of the bottom of your hole. The layer of coarse sand we’ll add next will more than fill that.
*Top Tip: Make sure to keep any stones you remove from your hole as they can be used later on for decoration or planting.
Step Six: Plugging The Gaps
Now that your liner fits nicely, it’s time to add some additional support and fill in any pesky gaps that may have developed. Enter Sharp or Coarse Sand.
This malleable, soft sand will cushion and protect your liner in the earth, and help to level off any stubborn, uneven surfaces you have inside. It was a life saver for an amateur digger like me and pretty affordable to boot! I purchased four, 25kg bags at £1.99 each at Sam Turner’s, one of my local garden centres. As general prices online seem to be through the roof, the link I’ve provided is to their site, but I digress…

Go ahead and shovel some sand into the bottom of your pond. You want to achieve a layer about two inches (5cm) thick for your liner to sit on.
I know we maintained a 2cm gap, but the idea is that the top of your liner will stand slightly above ground level to prevent run-off from the surrounding area polluting your pond when it rains.
Once you have the right amount of sand in there (it took about two bags for me, all told), flatten it again and use your spirit level to make sure it’s level.
Now, the moment of truth. Pop your liner back into the whole and gently press onto the bottom surfaces to see if it is flush with the sand. If it is, breathe a sigh of relief and go and have your tea. If it isn’t, scream into a cushion and go and have your tea anyway… I strongly recommend spaghetti bolognese.
Hunger quenched and liner resting on the bottom of the hole, use the remaining sharp sand to pack out any gaps around the sides of your pond. Once the sides feel solid too, that’s all there is to it! Next up – filling it!
*Top Tip: I used some left over turf to support and disguise the sides of the liner that stood higher than ground level (see pic).
Step Seven: Filling It
Before you allow any water to enter your pond, it’s a good idea to deposit a layer of small stones or pebbles to cover the bottom. Not only is this aesthetically pleasing but it provides a larger surface area to which plants can anchor, and helps contain the mud that will form, providing a more natural environment for bottom dwelling critters to inhabit.
Whatever aggregates you use, make sure they’re no bigger than a a few centimetres in diameter and that you clean them before placing them. This goes for the interior of your liner too – any excess soil left inside will pollute your water and encourage algal blooms.

I chose some simple mixed gravel, again bought locally at a much cheaper price than online, but here’s an amazon link to give you an idea. A layer of 2 inches along the bottom should do the trick!
Again I bought four, 25kg bags of these and had more than enough left to create a pebble beach around the pond.
Now, onto the water. If you have the patience of a saint, then experts say you should wait for rain water to fill your pond.
Unlike tap water, it’s free of added composites like fluoride and nitrates. That being said, if you have the patience of an irritated bulldog like me, with time and the help of some oxygenating plants, these chemical levels will dissipate and balance out in a few weeks. This leads us nicely onto our next step…
Step Eight: Oxygenating Plants
Firstly, if you’ve filled your pond with tap water, try leaving it to settle for a week before popping any plants in and when you do, it’s a good idea to invest in some hardy, green oxygenators. Not only are these easy to keep (just drop ‘em in) but they grow quickly too, creating coverage for your pond’s budding residents.
Perhaps most importantly, though, they help maintain a high level of oxygen in your water and compete with algae for nutrients. So, find the right balance of oxygenators and you might just find your water remains crystal clear!
Now there’s a wide variety of oxygenating plants to choose from and picking a mix is best as all pond dwellers have their favourites. I won’t list them all for you as there’s quite a few and, quite frankly, I’m planning to watch some paint dry instead.
However, the main thing to know is that there are three types; Deepwater, Marginal and Free Floating. Marginals are good for your pond’s shelves. The other two… well they speak for themselves. You can find all of these at just about any garden centre and they are cheap, so head on down and pick some out!
I opted for;

– A basket of deepwater ‘Mixed Oxygenators’ which sits on the bottom of the deepest section of my pond. It contains Pepper Grass and… something I haven’t quite yet placed.
– A few bunches of the free-floating Thread-Leaved Water-Crowfoot and Hornwort . These come tied with a small weight attached, so you literally just throw them in.
– A couple of small, marginal Scirpus (Fibre Optic) Plants.
– And a couple of larger marginal Grasses.
All of the above are flourishing without maintenance.
Step Nine: Flowering Plants
With regards to flowering plants, ideally you want to find some that’ll spread across the surface of your pond and offer your resident amphibians good coverage. Thus it’s a good idea to find a couple of broad-leafed plants that flourish at different times of the year.
Working on this theme, I repotted a Water Lily cutting, provided kindly from a friend’s pond, and have combined it with an Aquatic Hawthorn (see pic).

The lily flourishes through the Summer, while the Hawthorn should really start to come into its own as Autumn and even Winter progresses.
Even so, it’s the Hawthorn that has provided the first flowers of the two and that’s despite dying back over the Summer! Meanwhile the Lily has developed a Little Shop Of Horrors-esc bud, which is still yet to open up and start singing.
To compliment these two surface spreaders, I popped in an Iris, which, as a marginal plant, can be kept in shallow waters or in damp soil nearby.
I placed mine on a shelf in my pond and let me tell you, it’s the bane of my life. With it’s long, broad leaves, it’s like a sail in the wind and so whenever someone coughs near it, it hurls itself over no matter how I weigh it down, so take heed, friends!
As always, though, the choice is yours and there are many to choose from, so go wild! Just remember, you want to achieve about two thirds coverage as that’ll invite critters in and block algae from accessing all important sunlight.
*Top Tip: Flowering plants that spread their leaves across the surface like the Lily and Hawthorn need to be able to reach the surface to access the sun and photosynthesise.
So, when you first put them in, make sure they can reach the top by propping them up on a clean brick or flower pot. Then every week or two, as they grow, lower them gradually until they’re resting happily on the bottom and their leaves nicely reach the surface.
Step 10: Do I Need A Filter?
In short, no. Any body of still, standing water is going to host algae to a certain extent. However, without resident fish, the risk is somewhat diminished… though not entirely.
The oxygenating plants you throw in should help a great deal but to aid their cause, I also purchased a solar powered aerator. It basically pumps oxygen directly into the water and helps keep the water quality high. At £50 it was definitely the most expensive part of this process but as my water remains crystal clear to this day, it seems to be worth every penny. You can see it bubbling away in this video…
If you’re keen to guarantee crystal clear water, however, a filter is the thing. Now while you can purchase solar powered filters, most pond owners would have you purchase a UVC Filter and they (largely) require mains access and are a bit more expensive.
WHAT IN THE NAME OF FFFF-RODO AND ALL THE OTHER HALFLINGS is one of those, I hear you ask? Well, quite simply, it’s a pump that passes water past an ultraviolet light. This causes any algae in the water to clump together, making it easier for the accompanying filter to hoover it up.
Due to their added expense and mains connectivity requirements, I’d recommend going with oxygenating plants and maybe a solar aerator to begin with. From there you can see how things go. If you end up with pea soup, go ahead and get a filter in.
Anyway, I think that’s about that! Happy ponding! If you make a Victoria Sponge, send me a slice – I’ll be happy to supply written feedback. Not really, I wouldn’t be happy about it. In fact, don’t bother sending it, I’ll pop round, Mum… who am I kidding, I live upstairs…
*Final Top Tip: Ensure your pond has a ramp leading out of it, so that any creatures that clamber in have an easy way out. Likewise, leave an area around your pond to grow wild as this will give them a place to feel safe and encourage them to stay nearby.